Migrate a Swift Package
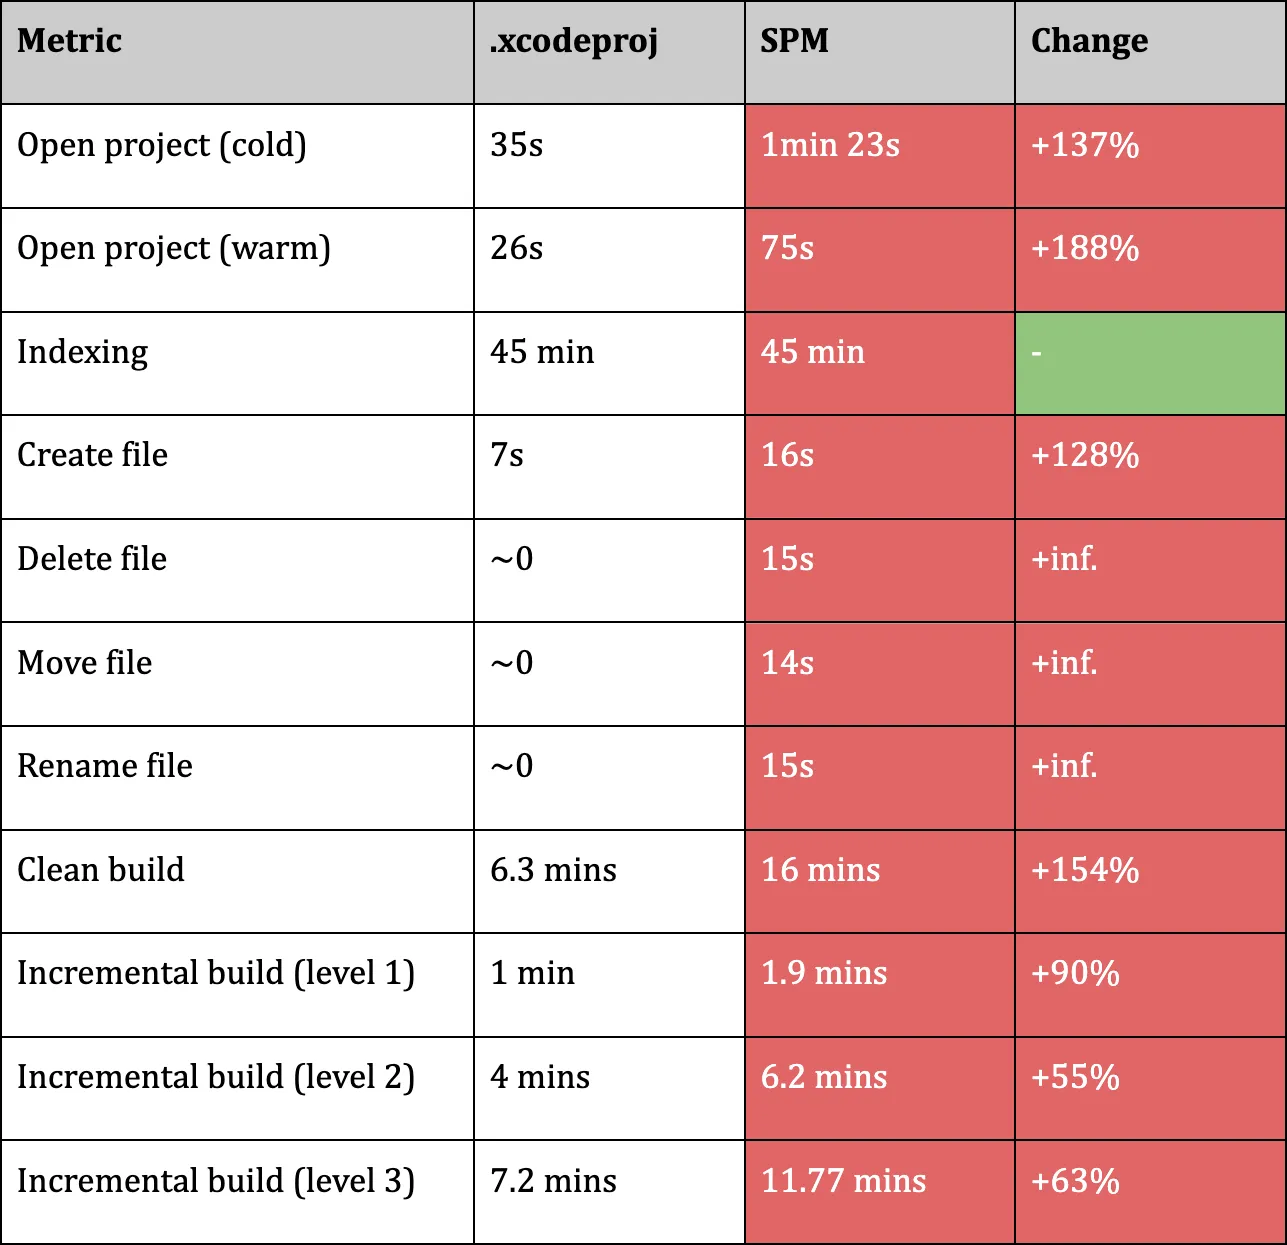
Swift Package Manager emerged as a dependency manager for Swift code that uninentionally found itself solving the problem of managing projects and supporting other programming languages like Objective-C. Because the tool was designed with a different purpose in mind, it can be challenging to use it to manage projects at scale because it lacks flexibility, performance, and power that Tuist provides. This is well captured in the Scaling iOS at Bumble article, which includes the following table comparing the performance of Swift Package Manager and native Xcode projects:

We often come across developers and organizations that challenge the need for Tuist considering that Swift Package Manager can take a similar project management role. Some venture into a migration to later on realize that their developer experience has degraded signicantly. For instance, the rename of a file might take up to 15 seconds to re-index. 15 seconds!
Whether Apple will make Swift Package Manager a built-for-scale project manager is uncertain. However, we are not seeing any signs that it's happening. In fact, we are seeing quite the opposite. They are making Xcode-inspired decisions, like achieving convenience through implicit configurations, which
as you might know, is the source of complications at scale. We believe it'd take Apple to go to first principles and revisit some decisions that made sense as a dependency manager but not as a project manager, for example the usage of a compiled language as an interface to define projects.SPM AS JUST A DEPENDENCY MANAGER
Tuist treats Swift Package Manager as a dependency manager, and it's a great one. We use it to resolve dependencies and to build them. We don't use it to define projects because it's not designed for that.
Migrating from Swift Package Manager to Tuist
The similarities between Swift Package Manager and Tuist make the migration process straightforward. The main difference is that you'll be defining your projects using Tuist's DSL instead of Package.swift.
First, create a Project.swift file next to your Package.swift file. The Project.swift file will contain the definition of your project. Here's an example of a Project.swift file that defines a project with a single target:
import ProjectDescription

let project = Project(
    name: "App",
    targets: [
        .target(
            name: "App",
            destinations: .iOS,
            product: .app,
            bundleId: "dev.tuist.App",
            sources: ["Sources/**/*.swift"]*
        ),
    ]
)
Some things to note:
- ProjectDescription: Instead of using
PackageDescription, you'll be usingProjectDescription. - Project: Instead of exporting a
packageinstance, you'll be exporting aprojectinstance. - Xcode language: The primitives that you use to define your project mimic Xcode's language, so you'll find schemes, targets, and build phases among others.
Then create a Tuist.swift file with the following content:
import ProjectDescription

let tuist = Tuist()
The Tuist.swift contains the configuration for your project and its path serves as a reference to determine the root of your project. You can check out the
Editing the project
You can use tuist edit to edit the project in Xcode. The command will generate an Xcode project that you can open and start working on.
tuist editDepending on the size of the project, you might consider using it in one shot or incrementally. We recommend starting with a small project to get familiar with the DSL and the workflow. Our advise is always to start from the most depended upon target and work all the way up to the top-level target.
